
How To Create Chrome Extension In 5 Minutes
First of all, what is a Chrome Extension? Let’s look what Wikipedia says about it.
Google Chrome Extensions are browser extensions that modify the Google Chrome browser. These extensions are written using web technologies like HTML, JavaScript, and CSS. Google Chrome Extensions are downloadable through the Chrome Web Store.
To be shortly, using familiar for us technologies as HTML, JavaScript and CSS we can make some changes to Chrome browser(modifying content of a page, add some useful functionality and etc.).
What we will do
In this tutorial I will be creating simple Chrome Extension that tints to some opacity(that we set in settings) images that match our preferences. Here is what we will use
- Yeoman Chrome Extension Generator
- Atom(my favorite editor)
Step 0
In order to be able to debug and see your extensions, we need to enable developer mode in Chrome Extensions. Simple go to Windows -> Extensions and tick the Developer mode on. You can load extensions by choosing your extension folder, or they will be loaded automatically when you execute gulp watch in Step 1.

Step 1
Using this GitHub repo and the Docs provided there we generate chrome extension package. Here is shortly what we do:
# Please make sure that `yo`, `gulp` and `bower` was installed on your system using this command:
npm install --global yo gulp bower

# Install the generator:
npm install -g generator-chrome-extension

# Make a new directory, and `cd` get into it:
mkdir image-tinter && cd $_

# Generate a new project
yo chrome-extension

# Transform updated source written by ES2015 (default option)
gulp babel
# or Using watch to update source continuously
gulp watch

# Make a production version extension
gulp build
Note that, when generating chrome-extension with yeoman, we need to choose Browser Action, as we modify browser content
Step 2
After Step 1, we will have proper project structure generated by Yeoman. The main project is in app directory of project. The main file is manifest.json. We will add these lines inside:
"permissions": [
  "activeTab"
]
This permission gives us access to active tab in the browser. We don’t need to modify other lines, since they are generated by yeoman.
Step 3
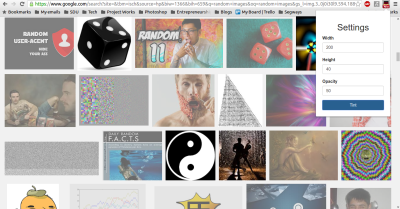
Creating the view for our extension. Here we work with the file popup.html, where the view of our extension is handled. This popup is shown when we click the icon of the extension. Since we are creating Image Tinter, we need simple form for preferences. We adjust width and height of images to tint, and the opacity we want it to be. And add the button to let the process start. Here is the main body of popup.html:
<body style="min-width:250px">
  <h2 style="text-align:center">Settings</h2>
  <fieldset class="form-group">
    <label for="width">Width</label>
    <input type="text" class="form-control" id="width" placeholder="Width" value="40">
  </fieldset>
  <fieldset class="form-group">
    <label for="height">Height</label>
    <input type="text" class="form-control" id="height" placeholder="Height" value="40">
  </fieldset>
  <fieldset class="form-group">
    <label for="opacity">Opacity</label>
    <input type="text" class="form-control" id="opacity" placeholder="Opacity" value="50">
  </fieldset>
  <button style="width:100%;" class="btn btn-primary" id="tint">Tint</button>
  <script src="scripts/popup.js"></script>
</body>
Optional: I added bootstrap.css to somehow enhance the view.
Step 3
Here comes the main logic. We modify the content of scripts/popup.js. This one is called every single time we open our click our extension. The logic is simple: when user clicks the button, all images those match our preferences are tinted. Steps:
- Add Click listener to button
- When click is caught, get parameters of width, height and opacity
- Execute JavaScript code that will tint images.
Here it is:
document.getElementById('tint').addEventListener('click', function(e) {  var width = document.getElementById('width').value;
  var height = document.getElementById('height').value;  var opacity = document.getElementById('opacity').value;
  var execCode = ' \
    var imgs = document.getElementsByTagName("img"); \
    for (var i = 0; i < imgs.length; i++) { \
        if (imgs[i].height > '+ height +' && \
            imgs[i].width > '+ width +') { \
              imgs[i].setAttribute("style", "opacity: ' + opacity / 100 +'"); \
        } \
    }';

 chrome.tabs.executeScript({
   code: execCode
 });
});
Note that we execute Script separately - this is how code is executed through our extension.
Step 4
Enjoy the result. That’s it!
You can see the whole code in my GitHub repo.